

Tracking links
Share a vehicle's live position with someone who has no Yipii login — who can open it, when it stops working, and what a viewer can and cannot see.
A tracking link is a URL that shows one asset's live position to someone with no Yipii account. They open it and see a map. No login, no app.
You decide three things per link: what it shows, who can open it, and when it stops working.
The Sharing screen
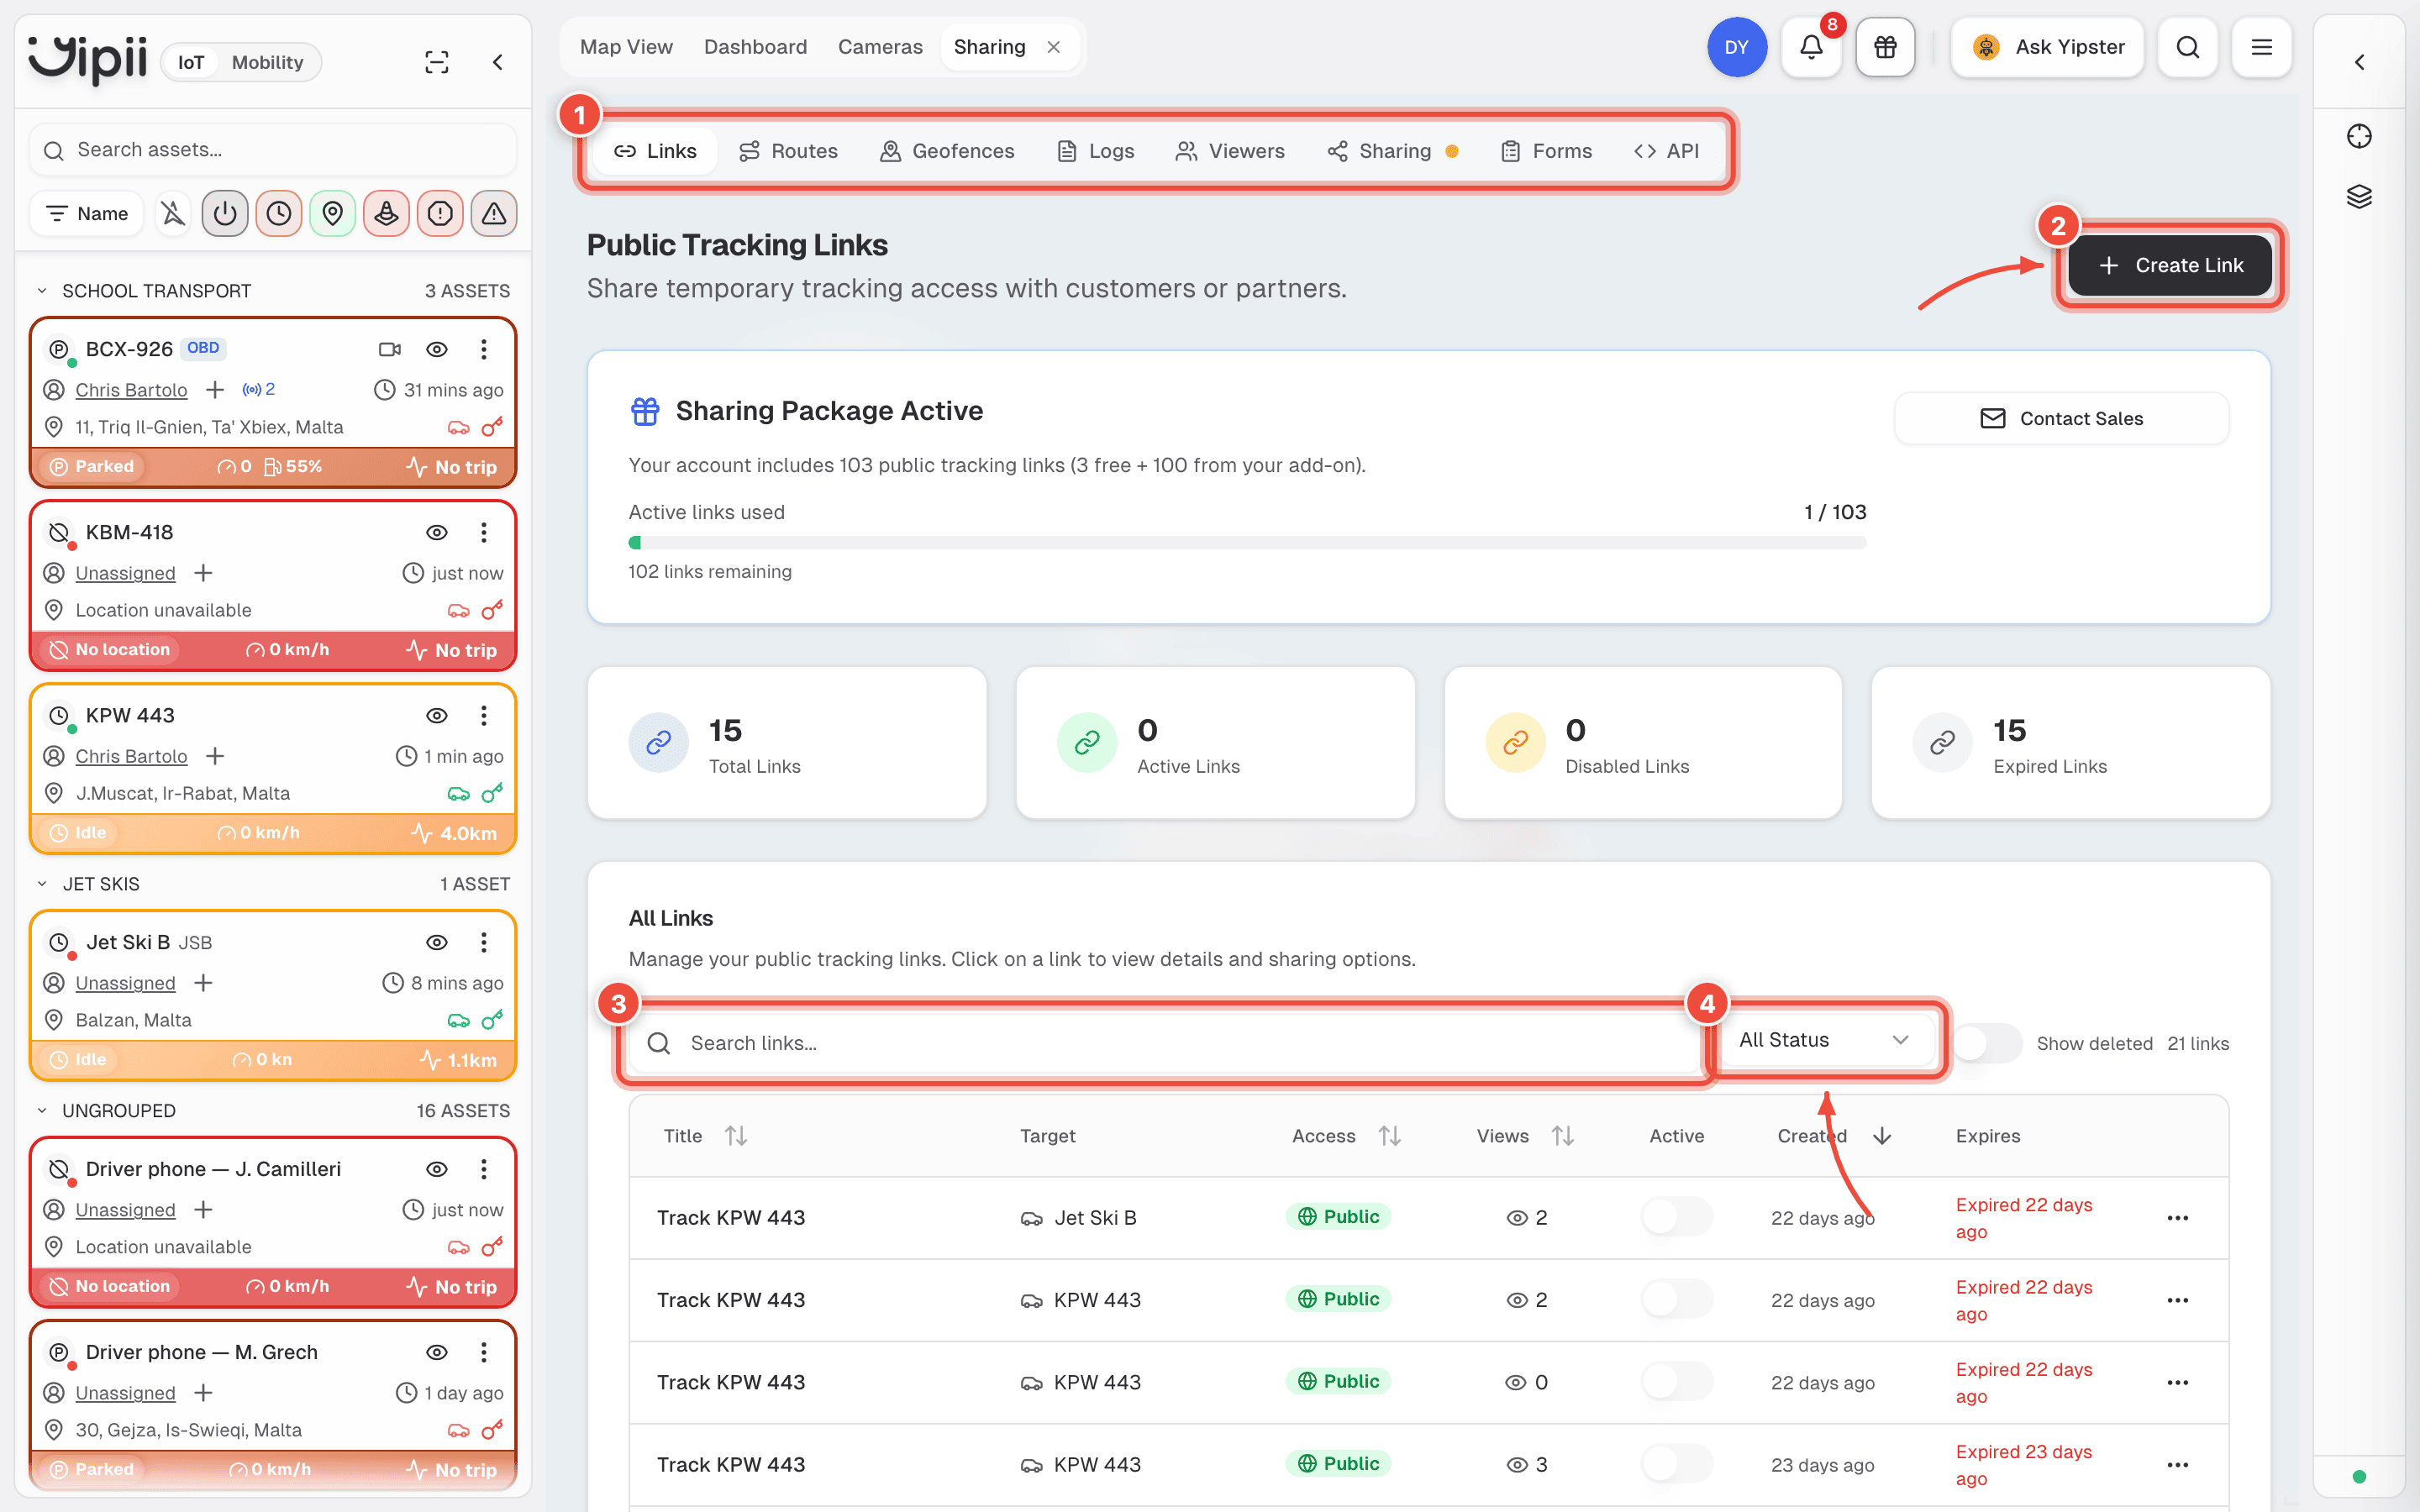
- Sub-tabs — everything to do with sharing lives behind this rail, not on separate pages. Routes for recurring runs, Geofences for arrival zones, Logs for who opened what, Viewers for the emails you have collected, Forms and API for automation.
- Create Link — the main action.
- Search links — matches the internal name, so name links in a way you can search for.
- All Status — active, expired, disabled. New links default out of view here once they expire, which is why a list can look emptier than the counts above it.
The four cards below the header count Total, Active, Disabled and Expired links. Only Active counts against your allowance.
Create a link
Open Sharing from the main menu and click Create Link.
The dialog opens on Basics, and the tab rail (1) holds everything else. Access carries both the access mode and the expiry; Schedule is the hours the link works during; Display is what the viewer sees; Stops is for route links. A link created without touching them uses your sharing defaults.
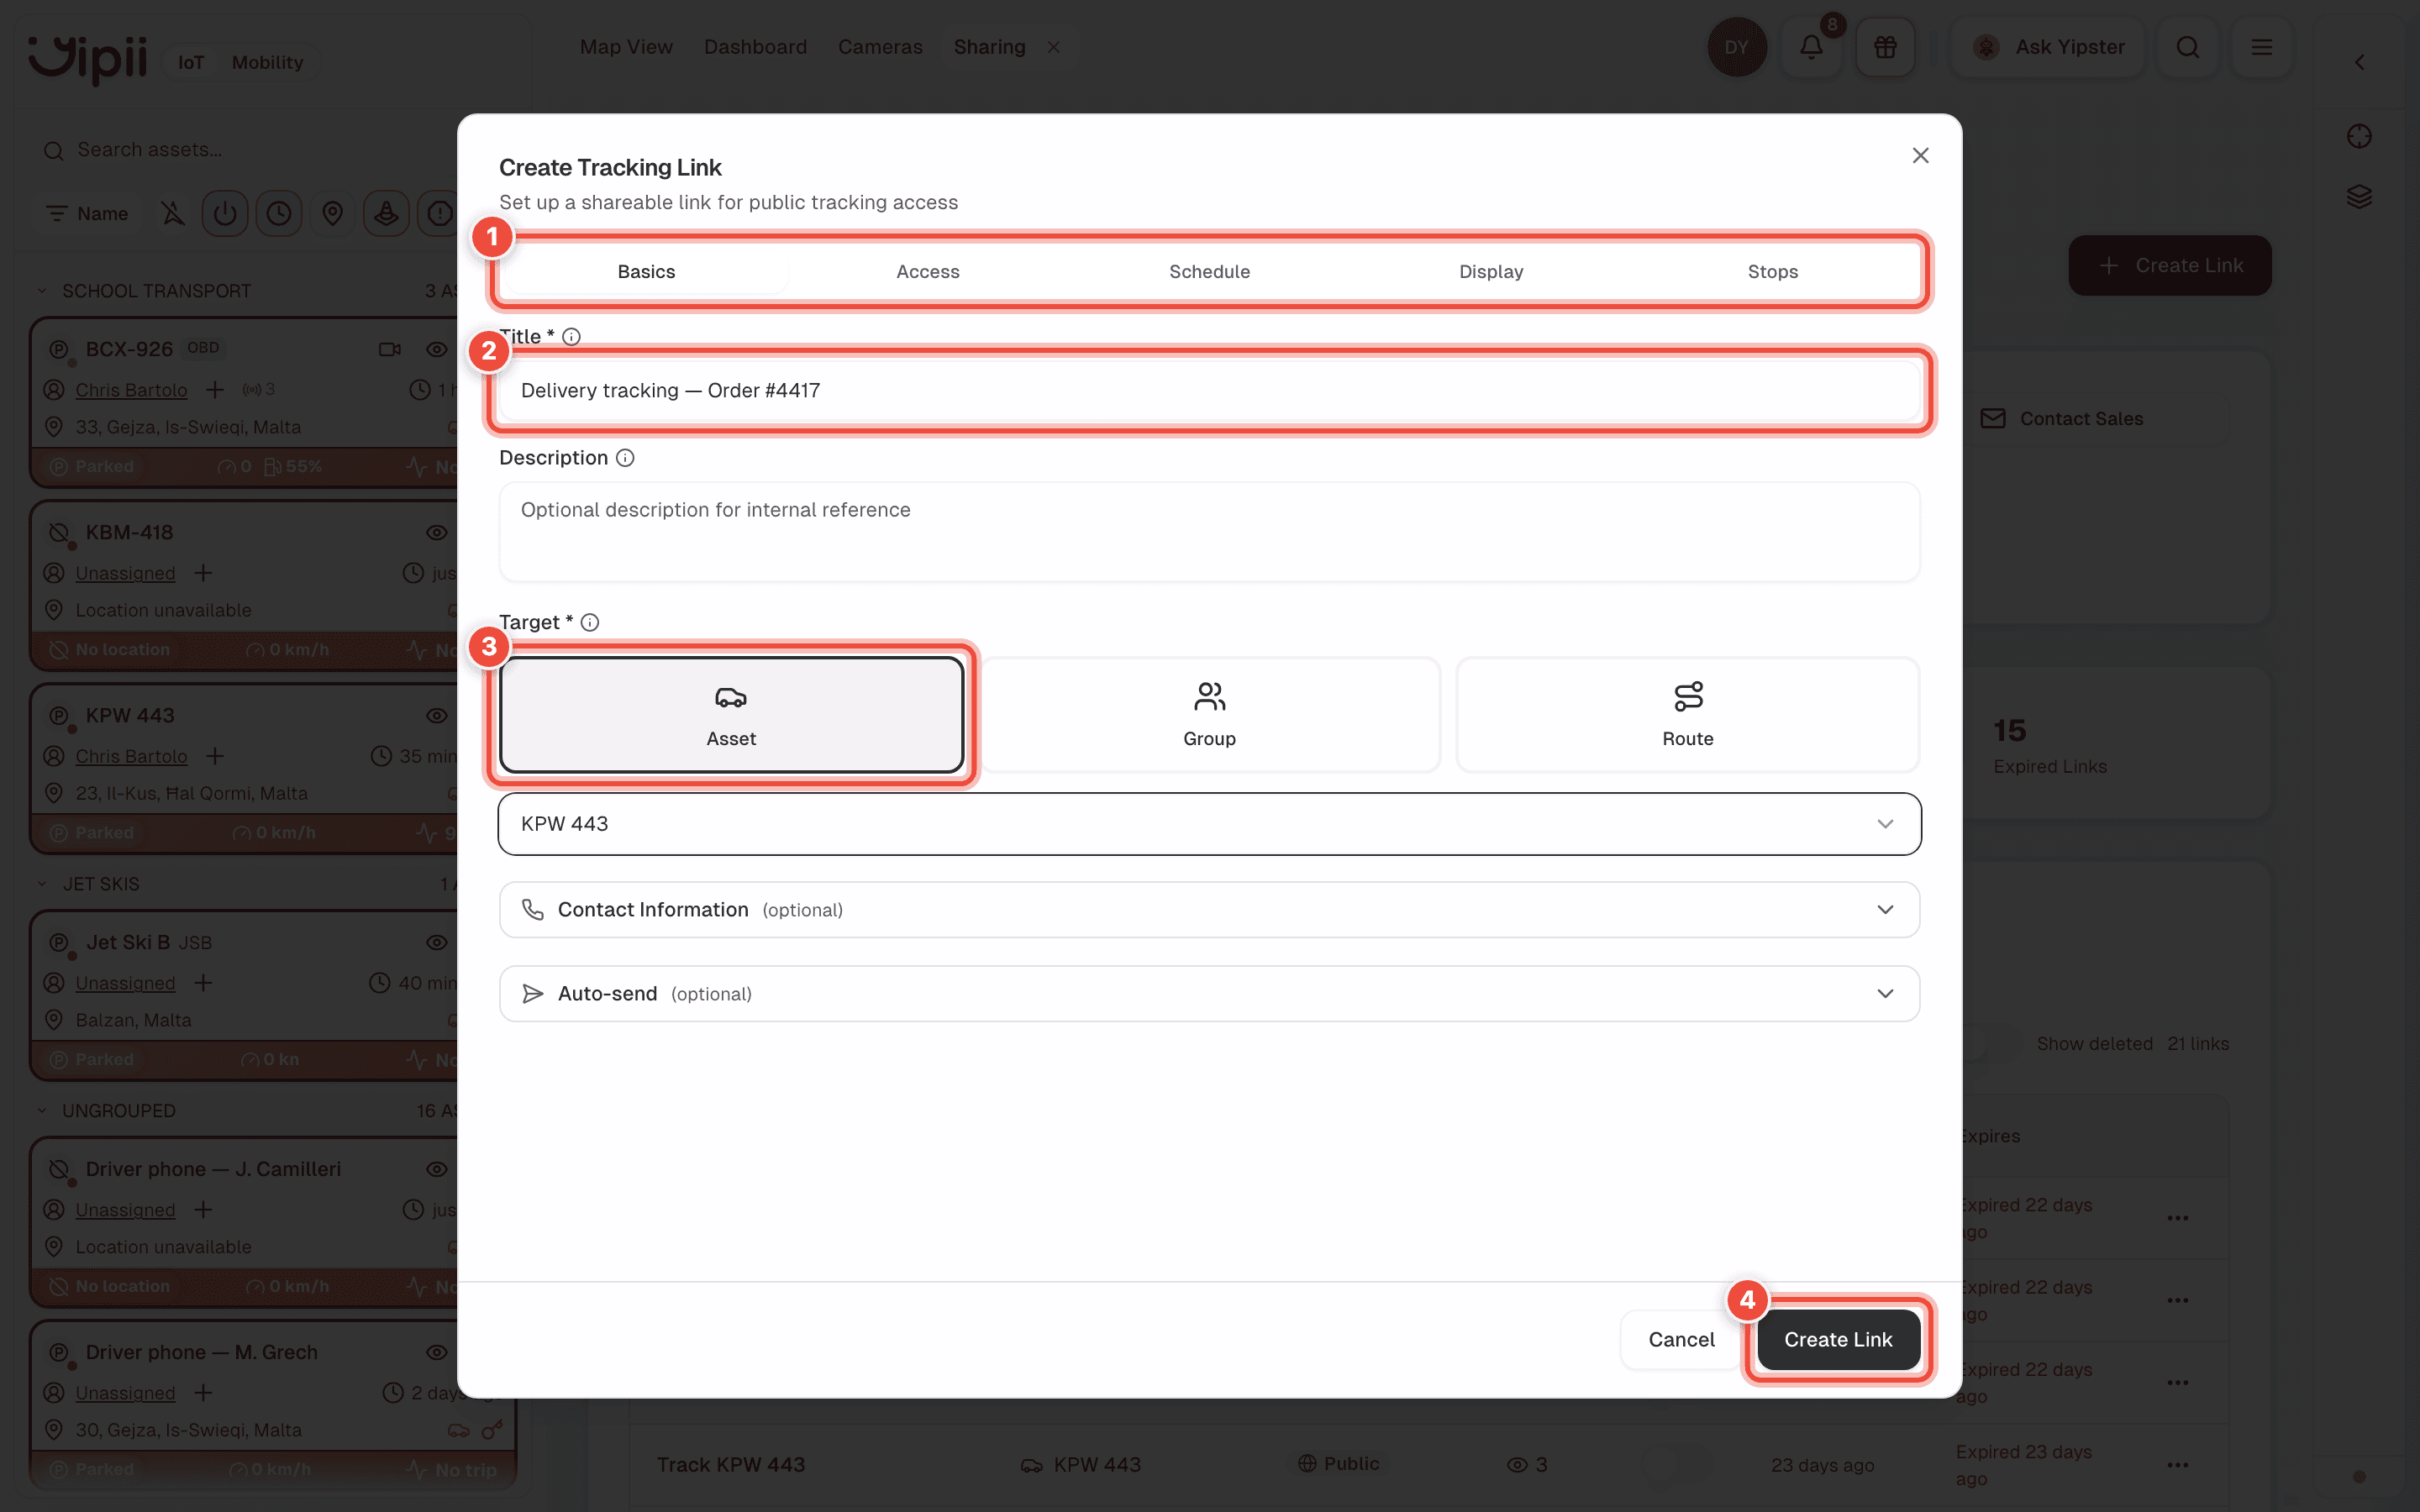
Type a Title (2). It does two jobs: it is what the search box on the Sharing screen matches, and it is the heading the viewer sees at the top of the tracking page. Bakery run beats Link 12 on both counts.
The title is public. Anyone who opens the link reads it, so keep internal notes, customer pricing and anything else you would not say to the recipient's face out of it. Leave it blank and the page falls back to the asset, group or route name.
Choose the Target (3): a single Asset, an asset Group, or a Route. Then pick the specific one from the list underneath. Title and Target are the only required fields.
Set the access mode and the expiry, both on the Access tab. Both are covered below.
Create Link (4), then copy the URL. It is short enough to put in an SMS or turn into a QR code.
What happens next
The link works immediately. Every time someone opens it, the visit is recorded under Logs with the time and, depending on the access mode, the email they gave.
Who can open it
| Mode | The viewer must | Use it for |
|---|---|---|
| Public | Nothing — open the link | Delivery tracking, QR codes on paperwork, anything you would put on a website |
| Email Only | Type an email address, which is logged | Sharing where you want a record of who looked |
| Email + Code | Type an email, then the link's 6-digit code, which you send them | A shared secret on top of the URL. High-value or sensitive loads |
| Authorized Only | Be on a list of addresses you approve, and enter a code emailed to that address | Contractual limits on who may see a vehicle. The only mode that proves who the viewer is |
Email Only does not verify anything. Anyone can type any address. It is an audit trail, not a lock.
Email + Code: where the code comes from
Yipii does not email the code. It is a fixed 6-digit code generated when you create the link, and it is your job to get it to the viewer — on the delivery note, in the WhatsApp message with the URL, over the phone. The viewer types their email, then that code.
Find or change it under the link's ⋯ → View details, where the code sits next to the URL (hidden until you reveal it). Regenerate code issues a new one and immediately invalidates the old — anyone still holding the previous code is locked out, which is how you revoke access without deleting the link.
The code is per link, not per viewer. Everyone you send it to shares it, and it does not prove who is on the other end. If you need to know exactly who has access, and to withdraw one person's access without disturbing anyone else's, use Authorized Only.
Authorized Only: the approval queue
You do not have to pre-load the list. A viewer who opens the link and enters an address that is not on it gets "Your access request is being reviewed", a request lands for you to action, and you get an email telling you someone is waiting.
There are two places to act on it, and they show the same rows:
- Sharing → Viewers. Pick the link in Select Tracking Link, then work the Pending, Approved and Blocked tabs. The Viewers tab carries a badge with the number of people waiting on the selected link.
- The link's own list. On Links, click the link, then Authorized Emails → Manage. Each row shows its status, and pending rows carry Approve and Reject.
Approving emails the viewer to say they are in, with the link and a note that they will be asked for a code. A rejected viewer can ask again; a blocked one cannot. Revoke withdraws access from someone you previously approved.
If that email goes astray — filtered, deleted, or the viewer simply never sees it — use Resend email on the Approved tab, or the send icon on the row in Authorized Emails → Manage. It re-sends the same access email and changes nothing about their access. It is only offered for viewers who currently have access, so nobody pending or blocked can be told they are in by mistake.
To skip the queue entirely, add addresses up front under Add Single or Bulk Add. Those viewers are approved immediately and never see the waiting message — but note they are not emailed, since you are usually adding a list you are about to send the link to yourself. Use Sharing if you want Yipii to send it for you.
How an approved viewer gets in
Approval decides which addresses may watch. A one-time code proves the person typing one can actually read its mail — so a forwarded URL plus a guessed address is not enough.
The viewer opens the link and enters their email.
If the address is approved, Yipii emails a 6-digit code. It is valid for 15 minutes, and requesting another one immediately kills the previous.
They enter the code and the map opens.
That browser is then remembered for 30 days. On later visits they enter their email and go straight through — no second email. A different browser, phone or incognito window starts again at step 2.
There is still no account and no password. Revoking or blocking someone also forgets their remembered browsers immediately, so withdrawn access takes effect on the next page load rather than whenever the trust expires.
Email Only and Email + Code do not send a code of their own. Email Only is an audit trail by design, and Email + Code uses the fixed code you distribute yourself.
The remaining exposure is the viewer's own inbox. Anyone who can read mail at an approved
address can get in, so a shared mailbox (info@, dispatch@) means anyone with access to that
mailbox can watch. For genuinely sensitive movements, approve individual named addresses and
pair the link with a short expiry.
When it stops working
An expired link shows a closing message instead of a map. It never silently keeps broadcasting.
| Expiry | Behaviour |
|---|---|
| Never | Works until you disable or delete it |
| Fixed date and time | Stops at that moment |
| Hours after creation | Counts from when you made it, whether or not anyone opened it |
| Hours after first access | The clock starts when the first viewer opens it. Send it early, and it stays valid |
| On arrival | Stops when the vehicle reaches the destination |
Hours after first access is the one most people want and least often find. Send a link with the morning's dispatch and it is still valid when the customer finally checks it at 15:00.
On arrival
Set a destination on the map plus a radius (50 m to 5,000 m; 100 m by default) and a dwell time (0 to 60 minutes; 5 by default). The link expires once the vehicle has been inside the radius for the dwell period.
The dwell time is what stops a link dying because the van drove past the address on the way to somewhere else. Set the radius to match the place, not the vehicle: 100 m is right for a house, too tight for a depot with a long approach.
Arrival expiry is configured on the link itself. It does not need a geofence — geofences are for alerts and reports.
Restricting the hours
Expiry ends a link. A schedule controls when it works while it is still alive.
Turn on scheduling and set windows of days plus a start and end time. Outside those windows the viewer sees a "not available" message rather than a map.
This is what keeps a school bus link from showing where the driver parks overnight. Set 07:00–09:00 and 14:00–16:00, Monday to Friday, and the vehicle is invisible the rest of the time.
Groups, for sharing several vehicles at once
One link can carry more than one vehicle. Point the Target at an asset Group and the viewer gets every vehicle in that group on one map, with a list naming each one and its status. Tapping a vehicle in the list centres the map on it.
This is the answer to "can I share a whole fleet with one URL" — build the group under Assets → Groups, then share the group. Membership is live: add a vehicle to the group tomorrow and the same link starts showing it, with no new link to send.
Billing above the free tier counts unique assets shared, not links. A group of 10 bills 10, whether you share it through one link or ten.
Routes, for recurring runs
A route solves the school-run problem: the same journey every day, a different vehicle depending on who is available.
Point a link at a route rather than an asset, and it shows whichever vehicle is assigned to that route today. Parents bookmark one URL for the year instead of getting a new link every morning.
Routes are built on the Routes sub-tab, with stops and a timetable.
What a viewer sees
The live position, and nothing else. Yipii strips the tracker IMEI, your account details and every internal identifier before the position is broadcast — a viewer cannot work out what hardware you run or what else is on your fleet.
Positions update live over a websocket. If that connection cannot be made, the map falls back to periodic refreshes rather than freezing.
Allowance and billing
Every account gets 3 free active links. Expired and disabled links do not count, so a link that ends on arrival frees its slot automatically.
A sharing add-on raises the cap; the header on the Sharing screen shows the arithmetic — for example 3 free + 100 from your add-on.
Above 3 active links, billing switches to every unique asset you are sharing, not the links beyond the third. Four links covering 10 assets bills 10 assets. Per-asset pricing is tiered, so the rate falls as the count rises — the current rates are on your billing settings.
Defaults
Settings → Sharing sets what a new link starts with — a default expiry of 1h, 2h, 8h, 24h, Until Arrival or No Expiry. Worth setting if you create links daily; it removes a decision from every one of them.
If it doesn't work
| Symptom | Cause | Fix |
|---|---|---|
| Create Link returns an error about upgrading | You are at your active-link cap | Disable an unused link, or add the sharing add-on. Expired links are already free |
| The link shows "not available right now" | A schedule window is in force and this is outside it | Check the schedule on the link. Remember it uses your account's timezone |
| The link expired far too early | Expiry was set as hours after creation, not after first access | Recreate it as hours after first access |
| An arrival link never expires | The vehicle passes through the radius faster than the dwell time | Lower the dwell time, or widen the radius |
| An arrival link expired mid-journey | The route passes near the destination on the way | Tighten the radius, or raise the dwell time |
| The viewer sees a map but the vehicle never moves | The asset is not reporting | Check the asset on the map and its tracker |
| An Email + Code viewer is waiting for a code email | That mode emails nothing — the code is fixed on the link and you send it | Read it under ⋯ → View details and pass it on with the URL |
| An Authorized Only viewer says no code arrived | It went to spam, or the approved address is wrong | Ask them to check spam. Codes last 15 minutes; asking for another kills the previous one. Confirm the approved address matches the one they typed |
| An approved viewer never got the approval email | It was filtered, deleted, or predates this feature | Resend email on the Approved tab |
| An Authorized Only viewer is asked for a code again | Their 30-day browser trust lapsed, they switched device or browser, or their access was revoked and re-approved | Normal — they enter the fresh code once and that browser is trusted again |
| The viewer says the code is rejected | The code was regenerated after you sent it, so theirs is stale | Re-read the current code under View details and resend it |
| A viewer on an Authorized Only link sees "being reviewed" | Their address is not approved yet | Approve them under Sharing → Viewers, or on the link's Authorized Emails → Manage |
| Viewers shows no pending requests but you were emailed about one | The wrong link is selected — the picker defaults to one link, and requests are per link | Change Select Tracking Link to the link the request came from |
| A viewer says "access denied" on an Authorized Only link | They have been blocked, or the address differs by a character | Look for a blocked row under Viewers; otherwise add the exact address under Add Single |
| Deleting a link did not free a slot | Only active links count, and the count is of active links | Re-check the Active card; expired links never counted |
| Create Link does nothing | Title and Target are both required, and Target needs the specific asset picked below the choice | Fill both on Basics |
| You cannot find the expiry setting | It is on Access alongside the access mode, not on Schedule | Schedule is the working-hours windows, which is a different thing |
Related
- Geofences — for alerts and reports; not needed for arrival expiry.
- Trackers — a link is only as live as the device behind it.
- Billing — where the sharing add-on and the current rates are.
- Field service — tracking links used in a real workflow.
Was this page helpful?